Friday, August 26, 2011

A new Obsession... CAKE POPS!


I have fallen into the new trend of tiny balls of cake, dipped in chocolate and stuck on a stick! Oh my goodness, not only are these absolutely delicious, they are addicting to make! There are endless possibilities... I have already gone through 50 lollipop sticks in a period of 5 days...

ANYWAYS! I have made 3 kinds so far. 2 have been plain decorated balls and the other I attempted to make "cupcake" cake pops. Lets just say they resemble more of Mario's mushroom friends than cupcakes. So they aren't making it to the blog. BUT, oh my, they taste good. Perfect for my Birthday party.

...It's my Birthday on Sunday hehehe. I'm not allowed to make my own cake, but I wanted to make something! Besides, I quite enjoy Dairy Queen Blizzard Cakes... We will be celebrating at one of my favorite campgrounds, having picnics, making s'mores and playing with glowsticks! I love camping with my cousins. So much fun!

Oh guess what is on my wish list? Bakerella's Cake Pop Decorating Book! Hahaha! So is Martha Stewarts CUPCAKES. I'm excited.

Next week at my little get together with my friends I'm making cupcakes, so stay tuned! There might be some from Martha's book!

On the agenda as well, black berry cream cheese coffee cake. Mmm...

Back to Cake Pops! Here are my recipes :)

Fabulous Styrofoam block

Super simple steps.

1. Bake the cake and let it cool
2. Destroy the cake in a food processor
3. Add frosting and stir to make "dough"
4. Roll into balls and refrigerate for 1o minutes
5. Dip the end of a lollipop stick into melted chocolate, and stick in the ball
6. Refrigerate for 10 minutes
7. Dip the balls into melted chocolate and stick on a styrofoam block to dry.
You can also decorate before the chocolate hardens with sprinkles ect...
*8 refrigerate again, this makes the outside of the chocolate hard, which my family likes.

Here is the vanilla cake recipe (I use it with my vanilla cupcakes as well)

1/2 cup butter, softened
1 cup granulated sugar
2 eggs room temperature
2 teaspoons vanilla extract
1 1/2 cups all purpose flour
1 3/4 teaspoon baking powder
1/2 cup milk ( I use skim)

Pre heat oven 350•F

Cream the butter and sugar until fluffy with an electric mixer, about 1 minute.

Add the eggs 1 at a time, beating for 30 seconds after each addition.

Beat in the vanilla extract.

Combine the flour and baking powder.

Beginning with the flour mixture, add half to the batter and beat until all combined. Add half the milk and beat.

Add half of the remaining flour and mix. Add the remaining milk and mix. Add the last bit of flour and beat.

Pour into a 9 inch square baking pan. No need to grease it. Bake for 25-30 minutes or until toothpick comes out clean. Cool completely.

I used this chocolate cake recipe from Joy Of Baking. Although the logic behind a "one pan" cake makes sense, I found it to be quite messy. But it still produced a beautiful cake! Next time I'll just mix the batter in a separate bowl and pour into the pan when finished.

Chocolate Cake

I use this whipped cream frosting for binding the balls

1 cup whipping cream
1 tablespoon granulate sugar
1/2 teaspoon vanilla extract

Beat everything until quite thick, but not butter.


Have fun making cake pops! I know I am!

Wednesday, August 24, 2011

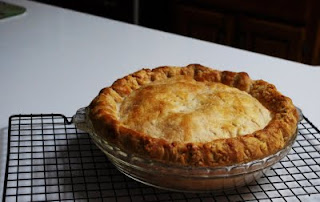
Peach Pie


This.is.pure.heaven.

I don't know what else to say.


So this is the pie I made with the leftover crust from my butter tarts because I only made a dozen. There might be a little too much pastry left, but I just made another mini tart with it. So basically your making this dough, minus 1 dozen little tarts. But you could always just half it. That would actually work really well! Huh... I can't believe I didn't think of that. Anyways! Once you have your pastry, all you need is the filling! And it is super simple, but absolutely delicious.

The Story Behind My Peach Pie Love.


When I was little, my family and my cousin's family would go camping in the Okanagan every summer. At this one campsite there was a pie man. Yes, I'm not messing with you, a pie man. I believe it was every Tuesday and Thursday he would come to our park. He basically drove a pick up truck and sold pies out of the back. Every single time, we got peach pie. It is my number one favorite. As well as my dad's. But finally we grew older and going to the same campground wasn't very exciting... and we got a bigger trailer that didn't fit. So we stopped going. And that meant, no more pie. I don't think I've even had peach pie since then. But when I made this pie, all the memories came back because it was simply incredible. When I had the first bite, I said "I feel like I'm in Penticton" and my dad said "So do I." This pie made me experience something I haven't been able to have in a very long time. So that's why I can't tell you how good this pie is because I have never had something like this happen before.
This is the pie man!

Peach Pie
Serves 8-10 people

Half of this pastry

Filling
6 cups of sliced, peeled, firm peaches (I used 5 large)
2/3 cup granulated sugar
1/4 cup all purpose flour
1 tablespoon lemon juice (I used orange because I had none)

Preparation

Toss the peaches, sugar, flour and lemon juice together. Set aside.

Pre heat oven 425•F and put the rack on the lower third of oven.

The pastry should be thoroughly chilled. Divide dough in half.
Roll out 2 inches wider than a 9 inch pie plate and place in pan. Trim edges so they are even. Leave a slight over hang. Add filling, but don't scrape in all the juices at the bottom of the bowl. There will be lots of juices created while cooking, and this will prevent unnecessary mushiness. Brush the edges of the pastry with beaten egg yolks and top with other piece of dough. Trim the edges until even. Tuck underneath the bottom layer to create a crust. Flute or crimp the edges. Brush egg yolk over the top of the pie and sprinkle with sugar. Poke steam vents.

Bake for 20 minutes. Reduce heat to 350•F and bake for 50 minutes or until the bottom of the pie is completely golden brown.

You can find the easier preparation on the Canadian Livings Recipe.

I hope you enjoy this as much as my family did.


Friday, August 19, 2011

I GOT A JOB!


I GOT A JOB!!! YIPPE!!! Now I get to bake for people! And I only have to work 2 days a week! This week I had a lot of orders. Chocolate banana cupcakes, butter tarts, cinnamon rolls, chocolate chunk cookies and more cupcakes for a staff party! Holy Moly! Talk about pressure! But I had so much fun making everything, and not having to worry about it going to waste. The only negative thing about it is baking at home. (Then again I get to bake in my PJ's...) My brother and dad weren't too happy when they couldn't sample any of the treats. I re-assured them that I won't stop making things for us. I have a fabulous peach pie recipe that I'm making this weekend so stay tuned! Next week I have a request for blueberry white chocolate scones... Mmmm!!!
Banana Chocolate Cupcakes!
Butter Tarts!
Best Ever Cinnamon Rolls!

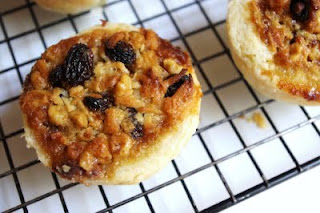
Grandma's Butter Tarts


Butter tarts! These... oh my... how do I describe them. Rustic, warm-your-heart, filled with love and butter-y goodies! That's one way of putting them. My Dad says they are simply the best. Probably because it's his mom's recipe. She taught my mom how to make them, and I kinda just tried them on my own yesterday. It's a very, VERY flaky crust. Probably because there is a pound of lard in there... but that's because they make like 1,000,000 tarts! Don't be intimidated! Just tryyyy to only eat 3. Or 4. It's hard, okay? Of course I only needed a dozen so I saved the rest of the dough for my pie. The filling is perfect in my opinion. A lot of butter tarts that I've tried are just too sweet. But these ones have a warm flavour that is complimented by nuts and raisins, with a hint of coconut. So! You can either wait until Christmas like I have to, OR! Make them today!

Grandma's Butter Tarts
Makes about 4 dozen

Pastry
6 cups all purpose flour
2 teaspoons salt
1 pound lard
1 egg beaten, poured into a liquid measure. Add 2 tablespoons white vinegar and fill up to the 8 ounce (1 cup line) with cold water.

Filling
4 eggs, beaten
1 cup butter
4 teaspoons vanilla
8 tablespoons milk (1/2 cup)
4 cups brown sugar
2 cups flaked coconut
2 cups raisins
2 cups chopped walnuts.

Pastry

In a large bowl mix the flour and the salt. Cut up the lard into smaller pieces and put in the bowl. Using either a pastry cutter or your hands, cut the lard until it resembles coarse oatmeal. There can be bigger pieces, it just makes the crust more flaky. Add the liquid measure ingredients and stir with a wooden spoon until just combined. Knead in the bowl to get any dry pieces, and knead about 5-10 times on a floured surface. But be gentle, you don't want to over work the dough.

Now roll out the dough about 1/8 inch thick. Using a round cup or cookie cutter, cut the dough big enough so it will fit into a muffin tin, with the sides going up to the top. Place in the tin until the filling is finished. No need to refrigerate.

Filling

Mix together all the ingredients in a large bowl. Simple as that. Fill the pastry cups almost to the top (to the top in my case) and bake in an oven pre heated to 375• for 15 minutes, or until golden brown. The dough might look kinda like wet or moist; I dunno why! But they are done when they are golden!

Cool for 10 minutes in the pan, then carefully move to a wire rack. They are very delicate! Cool completely.

Enjoy these fabulously flaky yummy in my tummy pastry!

Wednesday, August 17, 2011

Chocolate Banana cupcakes with Milk Chocolate Frosting


Summer cupcakes! I had so much fun making these! I was asked to make a dozen, any flavour, any theme, boy was it hard! But I have been dying to make these ever since I made them into a cake. They were that good. This is a super moist, chocolate-y banana-y cupcake recipe with a fantastic frosting. The original recipe from Joy of Baking used unsweetened chocolate in the icing, but I didn't have any. I really liked the milk flavour though because it complimented the rich flavour of the cake. Top it off with a white chocolate 'sea star' and your treats are made in a breeze!

Chocolate Banana Cupcakes

12 regular cupcakes

1 cup granulated sugar
1 cup all purpose flour
1/3 cup cocoa powder
3/4 teaspoon baking powder
3/4 teaspoon baking soda
1/4 teaspoon salt (I don't use salt...)
1 large egg
1/2 cup mashed ripe banana (I used one medium)
1/2 warm water
1/4 cup milk (I used skim)
1/4 vegetable or corn oil (I used canola)
3/4 teaspoon vanilla extract

Preparation

Pre-heat oven 350•F and place rack in the middle.

In a large bowl sift the cocoa powder to prevent any lumps. Add the granulated sugar, flour, baking soda and baking powder. Salt if using. Whisk to mix completely.

In another bowl (I used a large liquid measure, easy to pour wet ingredients) whisk the egg, mashed banana, warm water, milk, oil and vanilla extract.

Add the wet ingredients to the dry, stirring to combine. Scoop into a 12 cup muffin tin lined with paper liners.

Bake for 20 minutes, rotating pan halfway through. Will be done when toothpick comes out clean. You need to check because the banana needs to be completely cooked, or the cupcakes will sink in the middle... it's not pretty or tasty. Cool 10 minutes in the pan and on a wire rack until completely cool.

Chocolate Frosting
3 ounces unsweetened chocolate, chopped *I used milk chocolate*
1/2 cup unsalted butter at room temperature
1 cup confectioners sugar, sifted
1 teaspoon vanilla extract


Melt the chocolate in a heatproof bowl over steaming water. Cool to room temperature.

I did the next steps with a hand mixer, but you can use a stand mixer as well.

Beat the butter until smooth and creamy. Add the confectioners sugar and beat on medium speed until light and fluffy, about 2 minutes. Beat in the vanilla extract. Next add the melted chocolate mixing for about 2-3 minutes. If using unsweetened, the frosting will be dark and glossy, but if using milk, it will be light coloured. Both will be fluffy and smooth.

Put into a piping bag and pipe onto cupcakes.

White Chocolate Sea stars

white chocolate... not sure how much.
Sprinkles

Melt chocolate.

I have this nifty tool from Epicure Selections that is used for making tempered chocolate decorations. You put the melted chocolate in there, and just pipe out your designs. But you could also use a piping bag. Pipe onto a plate lined with wax paper. Then top with sprinkles. Place in the freezer for a few minutes, and lift off paper carefully, they are quite delicate. Place on cupcakes.


YUMMY! PRETTY! CUPCAKE!
*The chocolate decorator is currently not in stock, but check back in September!

Thursday, August 11, 2011

Peanut butter cookies


Ooo Ahhh... Mmmm... peanut butterrrr. One of my many weaknesses. Especially when it's slathered between 2 pieces of bread with sliced bananas. Oh well, Elvis would be proud.

So today I didn't exactly make Peanut butter banana sandwiches, I made my mom's favorite PB cookies. She goes crazy for them! Any time we go to a bakery, she will get something peanut butter-fied. And let there behold a cookie, she will get it. Of course because she is such a fanatic, she only will eat the best. To her taste, nothing measures up to this recipe. They are soft yet crisp around the edges, and melt in your mouth. So if your enduring a craving, try these cookies!

Florence's Peanut Butter cookies (from my Mom's mom's recipe book)
makes about 3 dozen cookies

3/4 cup margarine, softened
3/4 cup granulated sugar
3/4 cup brown sugar
3/4 cup smooth peanut butter (You could use crunchy, but nobody in my family likes it)
1 egg
1 teaspoon vanilla
1 1/2 cups flour
1/2 teaspoon baking soda
1/2 teaspoon salt (Like I said in previous posts, I don't use salt in most of my dishes)

Cream together the margarine and sugars. Beat in the peanut butter, egg and vanilla, until smooth. Add the flour and baking soda (salt if using) and beat until just mixed completely.

Refridgerate at least 30 minutes

Pre heat oven 375•F and have the rack in the middle.

Make dough into balls just a little bit bigger than half the size of a golf ball. Roll tops in granulated sugar and place on a baking sheet 1 - 2 inches apart. Press down slightly on tops with a fork.

Bake for 12 minutes and until they are golden brown around the edges. They will crack and fall into themselves slightly when cooling.

Thanks for reading my post!

Friday, August 5, 2011

Cornbread Muffins


Tiny, light, Tasty Muffins!!! BTW there are only 22 there because my dad and I ate one while they were warm... Mmmm


Tonight for dinner we're having BBQ chicken, potato salad and corn on the cob. A little bit more corn couldn't hurt, so I made some delicious cornbread muffins! I like the individual servings, and they are cuter than a loaf. This is my mom's friend's recipe, and it's the only cornbread I will eat. I love it! Perfect for a dinner like tonight. Although it makes 2 dozen, they don't rise very much. You can either cut down on the servings to make bigger ones, or have more than one! Either way they make a BBQ dinner have the perfect southern flair!

Susan's Cornbread muffins
2 dozen muffins

3/4 cup butter (1 1/2 sticks)
1 cup yellow cornmeal
6 tablespoons granulated sugar
4 eggs
1 1/2 cups all purpose flour
1 tablespoon baking powder
1 teaspoon salt
1 14 ounce can of Creamed Corn
1 4 ounce can of chopped green jalapenos
1/3 cup shredded cheddar cheese
1/3 cup shredded monterey jack cheese

Pre-heat oven 350•F

Cream together the butter, cornmeal and sugar on medium high speed with an electric mixer. Add the eggs 1 at a time, beating well after each addition.

In a medium small bowl whisk the flour, baking powder and salt. Stir into the wet ingredients on low speed.

Add the creamed corn, green jalapenos, cheddar cheese and monterey jack cheese until well combined.

Pour or scoop into greased muffin tins. There should be enough batter for 24 muffins. Or 18 large muffins.

Bake for 20 minutes or until toothpick comes out clean.

Enjoy! My mom can't stop eating them!

Thursday, August 4, 2011

Healthy Yogurt Parfait


I decided to go with a quick, delicious and nutritious recipe for today. This is probably my absolute favorite thing to have for breakfast. Other than sweets and pastries of course. But if I'm wanting to make something healthy, filling and tasty, this is my go-to breakfast. The Greek yogurt packs 18 grams of protein to keep you satisfied all morning, and the fresh berries carry yummy vitamins and nutrients. I use All-Bran Buds to give some nice crunch, while being less caloric than granola. And a drizzle of honey provides and nice subtle sweetness to the tangy yogurt. Any kind of fruits can be substituted aswell such as bananas, peaches, mangos, plums ect... Here you go!

Healthy Yogurt Parfait
1 serving

3/4 cup Fat Free Greek Yogurt
approx. 1/2 cup fresh blueberries
approx. 1/2 cup fresh raspberries
1/2 cup All-Bran Buds
Liquid Honey

In a tall glass or a bowl put about 1/4 cup blueberries in the bottom. Top with 1/4 cup of yogurt, 2 tablespoons All-Bran buds and a drizzle of honey.
Repeat but with raspberries. And again with blueberries. Top with remaining berries, All-Bran buds and honey.

Super easy, super satisfying!

Find me on Facebook!


Hi! A lot of my friends and family have facebook, and have been bugging me to make a page. Finally I did! It's a lot easier to see my updates of what I've been making. Usually I'll post a picture there, then the recipe here. Once it's been published on Blogger, I share the link on my page. If your interested, show how much you enjoy my blog by "liking" my facebook page!

Thank you!

Kala-Dawn's Kreations
http://www.facebook.com/KDsKreations

Wednesday, August 3, 2011

Peeps Baby Shower Cake


I saw this cake on Taste Of Home's website and immediately knew I would make it.It is so adorable! Although cake boxes aren't my favorite, that is easily adapted. It was Easter time when I discovered it, so when the Peeps went on sale, I got a few boxes. Because they are pre-packaged, I was able to store them until I needed them. When I got the info on my cousin's baby shower, I got so excited. Immediately I went searching for chocolate cake recipes. Joy Of Baking is a fabulous website that I'm starting to use more often. And the chocolate banana cake she made, looked decedent. And trust me, it is. It is so flavorful and moist, with a beautiful banana flavor. The ganache goes perfectly. I'm quite picky when it comes to chocolate cake, and this is an absolute new fave. I practically made my cousin make it, and she agrees, it's the best.

IT IS VERY RICH AND CHOCOLATEY... just the way I like it.

Peeps Cake (Idea from Taste of Home)
Recipe from Joy Of Baking

Chocolate Banana Cake
Ingredients:

2 cups granulated sugar
1 3/4 cup all purpose flour (you could probably even sub some whole wheat flour...)
3/4 cup cocoa powder
1 1/2 teaspoon baking powder
1 1/2 teaspoon baking soda
1/2 teaspoon salt (I omit salt in most of my sweet recipes...)
1 cup mashed bananas (I used 2 medium)
2 eggs
1 cup warm water
1/2 cup milk (I used skim)
1/2 cup canola oil
1 1/2 teaspoon pure vanilla extract

8 ounces semi sweet chocolate, chopped
3/4 cup heavy whipping cream
1 tablespoon butter

19 Peeps

Method:

Chocolate Banana Cake: Preheat oven to 350 degrees F (180 degrees C) and place rack in the center of the oven. Butter, or spray with a non stick vegetable spray, 9 inch spring form pan. Set aside.

In a large bowl whisk together the sugar, flour, cocoa powder, baking powder, baking soda, and salt. Set aside.

In another large bowl, whisk together the eggs, mashed bananas, water, milk, oil, and vanilla extract. Add the wet ingredients to the dry ingredients and stir, or whisk, until combined. You will notice that the batter is quite thin. Pour the batter into the prepared pan and bake for about 45 minutes or until a toothpick inserted in the center of the cake comes out clean.

Remove from oven and let cool on a wire rack. when completely cool, remove from spring form pan. Frost with chocolate ganache, covering top and sides of cake.

Ganache: Place the chopped chocolate in a medium sized stainless steel, or heatproof bowl. Set aside. Heat the cream and butter in a medium sized saucepan over medium heat (can also be heated in the microwave). Bring just to a boil. Immediately pour the boiling cream over the chocolate and allow to stand for 5 minutes. Stir until smooth. When Ganache has completely cooled, stir until slightly thickened.

Place Peeps around the edge of the cake. You can pull them apart before, but I think it would be better to keep them connected.


Enjoy! It's the ideal cake for Birthdays, baby showers or Easter celebrations!

Monday, August 1, 2011

New York Cheesecake with Blueberry Topping


My step cousin's family has been here for the past few days, and they always see my baking on Facebook. Because they comment the most; of course I'm going to make them something. Their favorite, cheesecake. It was a tough choice of which one to make, but because it's summer I wanted to use something from my garden. What has just grown? BLUEBERRIES! They are big, plump and sweet. Perfect for a warm blueberry sauce. This is my favorite cheesecake recipe from Canadian Living, with some adaptions to my family's personal preferences.


Combine crushed cookie crumbs and melted butter.


Press into the bottom of a 9 inch springform pan with the back of a spoon


Bake for 10 minutes and cool completely.


Combine cream cheese, sugar and vanilla.


That's one honking block of cheese. I <3 Costco


Beat on medium high speed until there are no lumps, or only a couple. Scrape down the sides of the bowl.


Add the sour cream, it makes the cheesecake super smooth and creamy.


Beat on medium high speed until there are no lumps at all. It's important to mix everything completely now.


Add the eggs, one at a time, beating only until combined. Barely 10 seconds on low speed.


Pour into a 9 inch springform pan that has been covered in tin foil. Place in a larger pan. Fill the pan with an inch of water.


Bake for 1 hour in the oven at 300•F. The middle should be slightly jiggly when done.


CHEEEEESECAKE has been created. Please ignore the ugly brown spot. That is my oven's fault. But when you put a pretty topping on, nobody notices :) Cool completely and refrigerate overnight.


For the topping just place all the ingredients in a small sauce pan over medium-high heat. Cook for about 5 minutes, just until the blueberries begin to burst and the sauce thickens.

Spoon over cheesecake slices before serving. I prefer the topping warmed.
I hope you enjoy making this delicious cheesecake!

New York Cheesecake with Blueberry topping (Adapted from Canadian Living)
Serves 12

Ingredients:

1 package of Dad's oatmeal cookies crushed in food processor until crumby.
1/4 cup melted butter or margarine

3 250 gram packages of cream cheese
3/4 cup of granulated sugar
1 teaspoon vanilla extract
Pinch of Salt (optional, I prefer omitting this)
1 cup sour cream (I use non fat, it works fine)
4 eggs

2 cups blueberries
1 tablespoon lemon juice
1/4 cup granulated sugar (Berry sugar is my preference with fruit sauces)
1 teaspoon corn starch
2 tablespoons water or fruit juice

Referral Canadian Living
http://www.canadianliving.com/food/strawberry_swirl_cheesecake.php